
Original post date: June 05, 2008
Now that our Earthen Talladega guitars have been block sanded smooth, they are ready for shader, which is what we call the transparent lacquer that creates the color. When we built the run of twenty-five Earthen Studio guitars I asked Gary to come up with a new sunburst color that evoked the origins of the special wood we were using. After some discussion and testing, Gary came up with a color I liked. It had a hint of brown earth tone, while still capturing the vintage fade we are known for. Of course, we named it “Earthen Burst.”
This time around, the opportunity to depart from the obvious use of the special color was overruled by my desire to create the other bookend to the series—so Earthen Burst it is. It’s our intent to shelve the color after we finish these twenty-five Talladegas in order to give them even more of a special identity.
One of the adjustments we made to the Earthen Talladega was to use Honduras mahogany for the body and neck. Because the Earthen maple has a bright snap to it, the maple neck of the Talladega would have emphasized just too much high end. The use of dense mahogany will offer balance. This creates a challenge to Gary, as the darker wood will require a reformulation of the shader for those parts in order to match the first run of limba guitars.
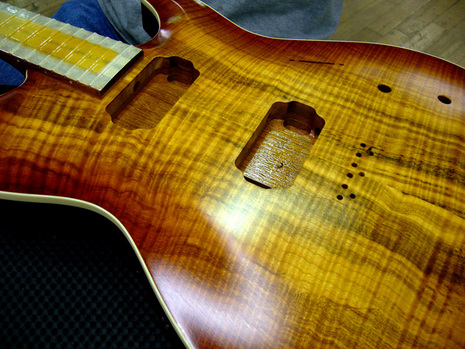

Here’s the shaded (colored) guitar hanging in the paint room. The masking tape has been removed from the sides of the guitar, but as you can see the burst color is still present over the binding on the face of the guitar.
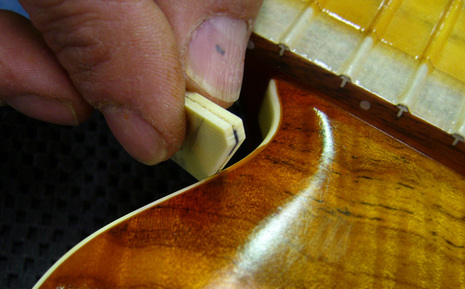

The next step is for Gary to scrape the color off of the top, revealing the ivoroid binding. For this, he uses a little knife that he’s made from pieces of cellulose and an xacto blade. The amount of blade that protrudes from the handle will determine the maximum amount of width that can be scraped. Because the thickness of the binding will vary slightly (we’re talking about thousandths here) Gary will angle the blade when needed to reduce the width of his cut. The object here is for the color to come just to the edge of the binding in a clean, crisp line. The easy and quick way to do this is to leave an overlap. There’s always a little, but to us that looks shoddy unless it’s really close. When you inspect a guitar, look at how close the color’s edge comes to the edge of the binding. That’s a pretty good way to judge how much care has gone into the building.

Here’s the result, ready to go back for some topcoats of clear. The lacquer goes on over the color, then it dries for two days before being block-sanded again. Then three more light coats before drying a final seven days. That’s a total of fifteen days for applying the finish and drying. The last sanding will bring the lacquer down to a thickness of about .011″ before it’s buffed out. We’ll come back for that later.